Root rot is a common problem faced by most plants – and orchids are no exception. And since the roots are responsible for delivering the nutrients from the soil to the plant, an orchid with root rot will easily become weak and unhealthy. Fortunately, it’s easy to revive orchids that are suffering from root rot.
To save your orchid, you have to uproot it from its current pot and remove all the rotting roots. Then, you have to re-plant it in a new pot with new soil just in case the old soil has already attracted fungi and pests. During this period, make sure to give your orchid water and sunlight to hasten the recovery process.
But as the saying goes, prevention will always be better than cure. As much as possible, you should be familiar with what causes root rot to avoid it in the first place. You should also be able to tell when your orchid is suffering from root rot – especially since the roots are not always visible.
Fortunately for you, this article will cover all of these topics for your quick reference.
What Does Orchid Root Rot Look Like?
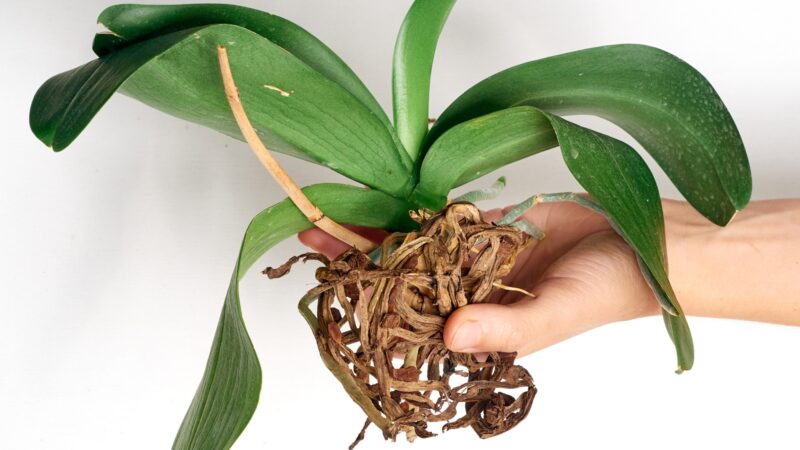
It’s easy to tell when an orchid has root rot. As its name implies, this is a condition wherein the roots of your orchid are beginning to rot. Thus, your orchid’s roots will turn brown to dark brown and will have a squishy texture.
In some cases, the roots will turn black and rotten, which is a sign that it has also been infected by bacteria, viruses, or fungi.
You will also see symptoms of root rot in your orchid plant. Since the roots are responsible for absorbing the soil’s nutrients, having root rot means that your plant is deprived of these minerals and nutrients.
Your orchid’s leaves will look soft and floppy instead of their usual firm appearance. If it has grown buds, these buds might also fall off even without any sign of damage or withering.
Orchid Root Rot vs. Healthy Roots
The symptoms of root rot are quite visible, so you can easily tell healthy roots from one that’s starting to rot.
For starters, healthy roots are firm to the touch and are usually a pale green or silvery in color. They are also thick and plump, which signifies that it is getting enough nutrients from the soil.
In contrast, an orchid root that’s suffering from root rot will be dark brown or black in color. It will also appear limp and mushy to the touch.
To help you visualize the key differences between healthy roots and root rot, here is a table for your reference:
| Healthy Roots | Root Rot | |
| Color | Pale green, silver | Brown, dark brown, black |
| Structure | Strong, firm | Drooping |
| Texture | Plump | Mushy |
What Causes Orchid Root Rot?
Root rot is a fungal disease that stems from roots that have been soaked in water for extended periods. There are three main reasons why orchid roots become soaked in water:
- It is being overwatered. Orchids only need a light shower once every seven to ten days. If they get more than their water requirement, the excess moisture in the soil will surely attract the fungi – and that will lead to root rot. Thus, it’s best to avoid deep soaking your orchid in water.
- It is not planted in well-draining soil. Another reason why orchids suffer from root rot is that the soil used is not well-draining. Soil like clay or silt is known to retain water, so using these to plant your orchid will lead to soaked roots that will rot eventually.
- The pot is clogged. If you only water your orchid as needed, and you’re using sandy or loam soil, but your orchid is still suffering from root rot, then the problem lies in your pot. Check your pot if the draining holes are clogged and remedy it accordingly. Otherwise, it will continue to trap in the water and continuously soak the roots.
Orchid Root Rot Symptoms
To help you identify if your orchid is suffering from root rot, here are the symptoms that you have to look out for:
- Brown roots. Of course, the very first symptom that you will see is that the roots of your orchid are no longer green or silvery. This is replaced by brown and brittle roots. And if it has been further infected by bacteria, these roots will also turn black.
- Yellow leaves. If you cannot see the roots on your orchid, another telltale sign is the yellow leaves on your orchid. Since it’s no longer getting the right amount of nutrients from the soil, it loses its glossy green foliage. The leaves will also look mushy and soft to the touch.
- Orchid remains flowerless. Orchids are quite easy to bloom, so you should know that there’s something wrong if it keeps failing to produce flowers. Usually, the buds will fall off from the stem despite looking healthy. This is because the plant can no longer support the production of new flowers, which drains quite a lot of its energy.
- Brown and mushy stems. Since root rot is often caused by prolonged exposure of the roots to water, then the part of the stem closest to the roots will appear mushy, brown, and moist. This signifies that the stem is also beginning to rot, which further attracts fungi and pests.
- Lifeless appearance. In general, your orchid will look lifeless and withered – instead of its usual upright appearance. This is one of the key symptoms to look out for to determine that your orchid is suffering from root rot.
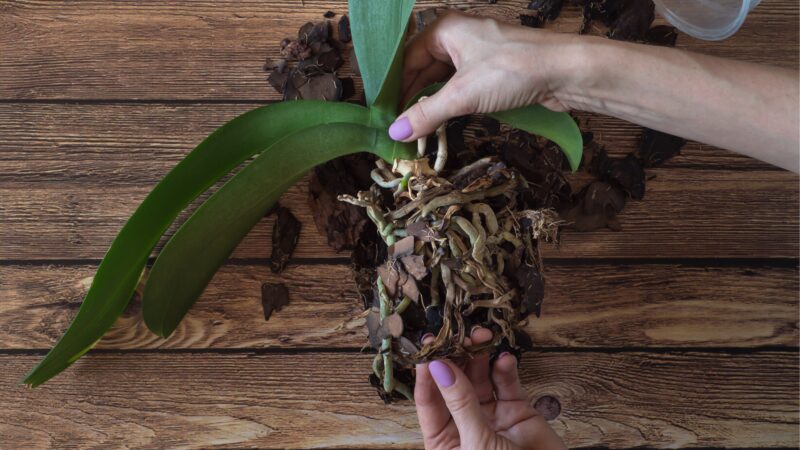
How to Remove Rotted Orchid Roots?
Step 1: Start by uprooting your orchid from the pot. Once uprooted, allow the soaked roots to dry for a day to remove any excess moisture.
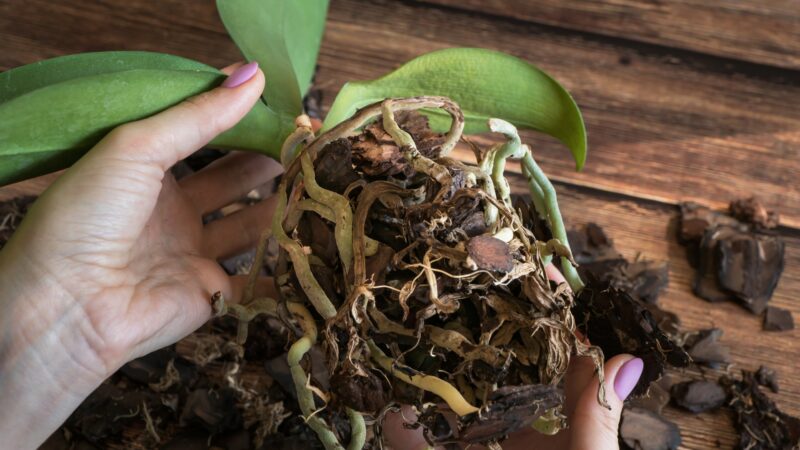
Step 2: The next step is to identify which roots are damaged. The roots that look brown and mushy are the ones that you have to get rid of, so you must remove all of them to ensure a successful recovery.
Step 3: Once you have identified the rotten roots, it’s now time to cut them off of the plant. For this, you can use a slim pair of garden shears to make sure you’re only targeting the damaged roots.
You may want to try the VIVOSUN 6.5 Inch Gardening Scissors Hand Pruner, which is slim and easy to grip, so you can cut the rotten roots swiftly and prevent them from causing any damage to the orchid. But before doing so, make sure to clean your garden shears to prevent any possible contamination.

- Reduce Hand Strain: These micro tip snips are made to reduces...
- Ultra Sharp Blades: These quality snips come with stainless steel...
- Secure, Easy to Lock: These micro tip snips feature a safe and...
- Make Precise Cuts: With these micro tip snips, you can easily get...
- Applications: Trimming trees and flowers, cutting papers, opening...
How to Regrow Roots on an Orchid Plant?
At this point, the damaged roots on your orchid have been successfully removed. Now, it’s time to learn how to regrow roots to ensure their recovery.
Step 1: The first step is to place the orchid in a pot and fill it with a mixture of loam and soil mix. As much as possible, choose a soil mix that’s targeted for growing orchids. The soil mix will help the roots absorb the nutrients faster so that they can regrow new roots and recover.
Step 2: After planting your orchid into its new pot, you should place it where it will receive indirect sunlight. This will prevent it from becoming sunburned but is still getting enough light to support its functions.
Step 3: Then, make sure to sprinkle it with water once a week or whenever the top layer of soil is already dry. Make sure not to overdo it – otherwise, the roots might become soaked again.
Step 4: Also, check the humidity levels near your orchid. As much as possible, keep it between 60 to 80% for faster recovery. Having a humidity meter like the KJCOOSWI Home Digital Hygrometer will help you monitor the moisture levels in the air.

- High Accuracy: The digital hygrometer thermometer range is from...
- Long Battery Life: The humidity gauge requires 2pcs AAA batteries...
- Humidity Reminder: The indoor thermometer reads data every 10...
- Widely Use: Indoor thermometer ensures proper temperature and...
- Portable with Three Mounting Choices: The digital hygrometer is...
As long as your orchid gets enough sunlight and water, it will surely regrow. However, you have to be patient since this will depend on the severity of the damage caused by the root rot. Expect somewhere between five weeks to three months for your orchid to fully recover.
Can You Save an Orchid With Root Rot?
It is possible to save an orchid with root rot, especially if it is still in its early stages. You can do so by removing the damaged or rotten orchid roots and moving the plant to a new pot. As long as you give it enough water and sunlight during the recovery period, your orchid will re-establish itself in its new pot and grow into a healthy plant.
How to Save an Orchid With Root Rot?
Now that you have planted your orchid, all you have to do is wait for it to re-establish itself in the ground. However, here are some ways that you can do to make sure your orchid gets saved after an episode of root rot.
- Bear in mind that orchids love warmth. With that said, make sure to keep your orchid in a warm temperature that’s at least 75 degrees Fahrenheit.
- You may opt to feed your orchid with fertilizer. As much as possible, use a fertilizer that’s specifically formulated for orchids, like the Scotts Miracle-Gro Orchid Plant Food Mist. It’s also in liquid form which makes it easier for the roots to absorb.
No products found.
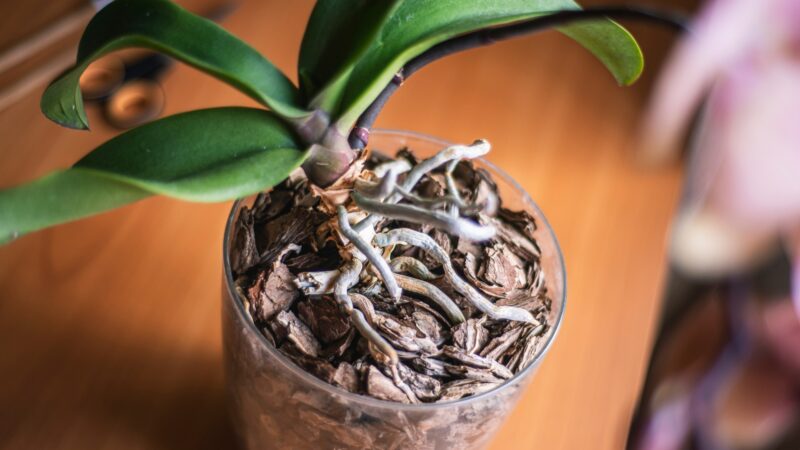
- To help you monitor the regrowth of your orchid’s roots, it’s best to use a clear pot like the TRUEDAYS Clear Orchid Pot. With a clear pot, you can watch over the progress of your orchid roots. This will also alert you in case there are other problems with the roots or soil.

- 【4 Pack Value Set】 Our 4 Pack 6 Inch Orchid Pots for...
- 【Professional Orchid Pot Design】 Clear Orchid Pots with Holes...
- 【Transparent Root Observation】 The Clear Orchid Pots allow...
- 【Durable PP Material】 Made of thick plastic, these Plastic...
- 【Multi-Scene Application】 These Flower Pots for Indoor Plants...
Related: When to Use Orchid Food? | 10 Best Orchid Fertilizers
How to Prevent Orchid Root Rot?
While root rot is common among orchids, that doesn’t mean that it cannot be prevented. Here are some pointers to remember to prevent your orchid from suffering from root rot:
- Make sure your orchid only gets the right amount of water. Orchids only need around three ice cubes worth of water every one or two weeks.
- Don’t hesitate to use a potting mix to make the soil more well-draining. Orchids only need moist soil, but they should not be soaked. You can add potting mix or pebbles to prevent water stagnation.
- Always check the pot in case it gets clogged. When the pot is clogged, the roots will become soaked in water, which will surely lead to root rot. Thus, always check the drainage holes in case of any soil buildup and remove the blockage as soon as possible. And if the clog seems impossible to remove, then it’s best to transfer the orchid into a new pot. During the transfer, make sure to use new soil, since the old and soaked soil may already be harboring fungi and bacteria.
List of Sources
Orchids – https://hgic.clemson.edu/factsheet/orchids/
Root Rots of Indoor Plants – https://extension.umd.edu/resource/root-rots-indoor-plants