Orchids grow adventitious roots that allow them to receive water, nutrients, and minerals from the soil or atmosphere, depending on the type of orchid. You need to know what healthy orchid roots look like to ensure the survival of your orchids.
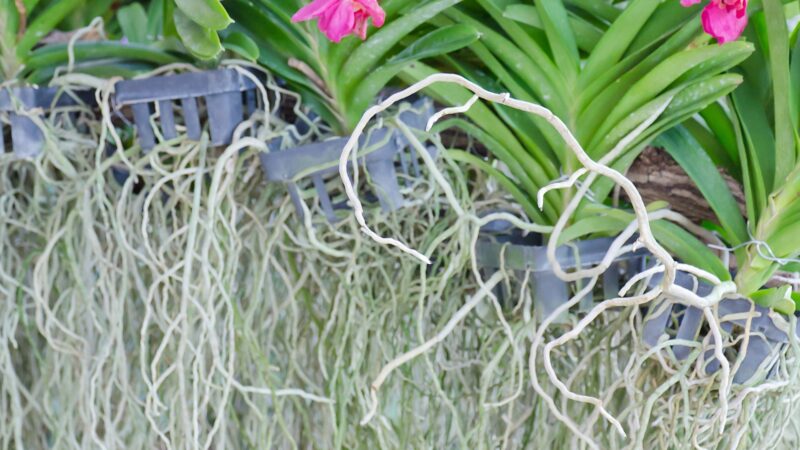
To identify healthy orchid roots, they should be firm and white or dull silver. Although this coloring may also indicate that the plant needs more moisture. After being watered sufficiently, their roots will change into a vibrant green color.
This article will provide you with everything you need to know about healthy orchid roots, types of orchid roots and their functions, spotting unhealthy orchid roots, and other interesting information!
What Are the Types of Orchid Roots?
Generally, orchids have adventitious roots, which emerge from plant parts other than the roots themselves, such as on a leaf or stem. Here are the specific types of roots that orchids have:
- Terrestrial orchids form three types of roots:
- Rhizomatous roots are root-bearing horizontal stem which usually lies beneath or on the surface of the soil.
- Orchids with tuberous roots grow a pair of egg-shaped underground tubers that are fleshy and store food and nutrients.
- Intermediate roots bear characteristics of both rhizomatous and tuberous roots.
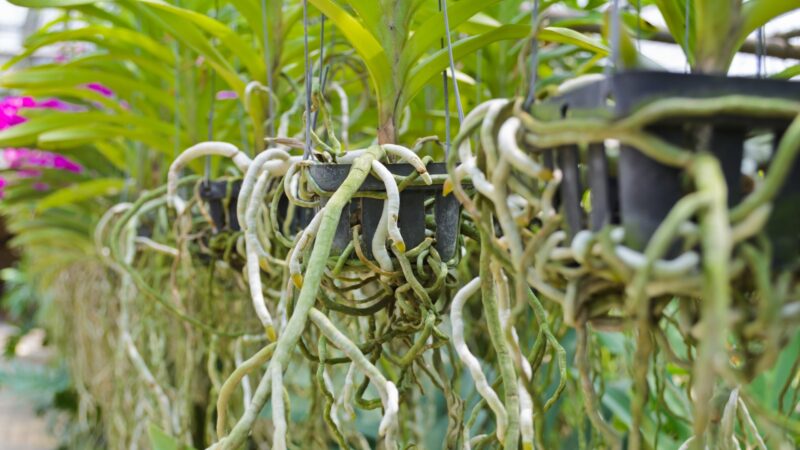
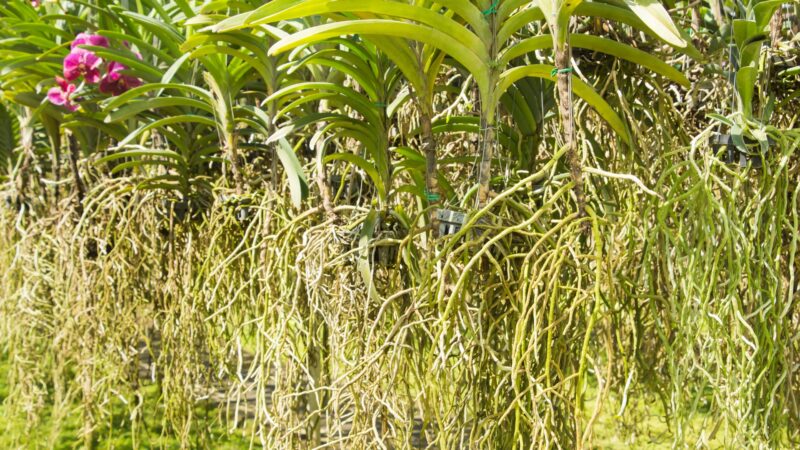
- Epiphytic orchids produce coarse aerial roots, which, as the name suggests, hang freely in the air and contain distinctive outer layers which separate the living root cells from the air.
What Are the Main Functions of Orchid Roots?
Orchid roots function to anchor the plant to the soil (in the case of terrestrial orchids), regulate gas exchange, distribute the products of photosynthesis, determine the growth habit of the plant, and control the flow of, absorb, and transport nutrients, water, and minerals from the soil to the rest of the plants.
How Can You Identify Healthy Orchid Roots?
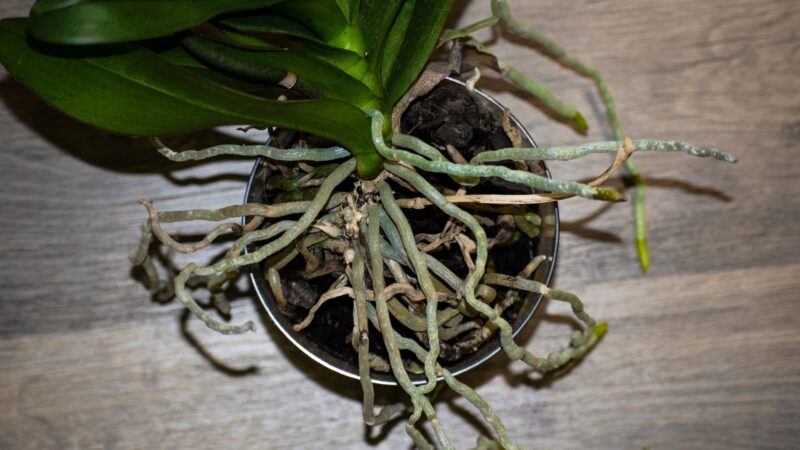
Healthy orchid roots are firm and have a white or dull silver coating, but this may also indicate that the plant needs more moisture. After being sufficiently watered, the color will change to a vibrant green.
How to Spot Unhealthy Orchid Roots?
You can tell from their appearance alone that they look rotten, damaged, dying, dead, or generally in bad shape. Roots that look tan and wrinkled mean that the orchid is severely dehydrated, while dark and mushy roots signify overwatering and the first symptom of root rot.
What Makes Orchid Roots So Special?
Most orchids have aerial roots, making planting orchids relatively easy as they do not need a soil mix to be rooted in. They also grow naturally on shrubs, trees, or rock outcroppings simply holding on using these roots.
What to Do With Orchid Roots?
You can use them to grow new orchids via vegetative propagation, which will be discussed in the next sections.
About Your Orchids Aerial Roots
The aerial roots of epiphytic orchids are unique and special because they can absorb atmospheric water, such as dew, rain, and mist, then transport it to the root interior of the orchids. These roots will often grow upwards and form nest-like structures that can catch nitrogen-rich matter.
Moisture is then absorbed by a highly specialized, porous, sponge-like material in the roots called the velamen radius, unique to epiphytic and semi-epiphytic plants, made from an intricate structure consisting of dead cells capable of transporting nutrients toward the leaves and pseudobulbs of the orchids.
Is It Okay to Cut Off Aerial Roots?
It is okay to cut off aerial roots, you can use them to grow new orchids or simply as a way of pruning to make your orchid look more presentable.
How to Repot an Orchid With Air Roots?
Step 1: Sanitize your hands, tools, and working area to eliminate any potential disease or debris.
Step 2: Purchase a sterile orchid medium beforehand. It can be bought at almost any garden center. You can also use plain tree bark medium. Do not use garden soils used for vegetable gardening as they may contain harmful microorganisms and pests.
Step 3: Gently wiggle the plant out of its pot. Remove any mushy or dead roots from the orchids, then discard the old medium you used. Thoroughly rinse the medium off of the roots using clean, lukewarm water.
Step 4: Place the orchids into a larger container with drainage holes and slits to allow better air ventilation. Add in bark material or rooting medium, moisten, drain excess water, then voila! You have successfully repotted your orchids with air roots.
How to Propagate an Orchid With Air Roots?
Division
This method should be done just before or just as the orchids begin to grow to ensure enough time to become established and for flowering to occur the following year. Here’s how you divide orchids:
Step 1: Using a clean, sterilized knife, cut the rhizome into sections with at least three leafy growths and one dormant bud attached to each section. Remove any shriveled pseudobulbs and dead or damaged roots.
Step 2: Root them in moist sphagnum moss with the dormant bud facing upwards, then store them in a warm area.
Step 3: After some time, you can slowly introduce the plant into its natural climate once roots begin to sprout and the plant establishes itself.
Stem Cuttings
Monopodial orchids can be propagated using a clean, sterilized knife or shears to sever stem cuttings found on the top of the plant. Afterward, root them in moist sphagnum moss and wait until roots emerge.
Backbulbs
Pseudobulbs of sympodial orchids will lose their leaves, become dormant, and develop new pseudobulbs as they age. The old pseudobulbs will then be referred to as back bulbs. Although dormant, they can be forced into active growth and produce new plants.
Step 1: Severe the back bulb from the rhizome of the orchid using a sharp, sterilized cutting tool. This may be stressful for the parent plant, so choose at least two back bulbs and a growing shoot.
Step 2: Plant the back bulbs in well-draining pots or communal trays with a porous medium such as composted Douglas fir bark. The eyes of the bulb should be above the soil level, while the base should be submerged.
Step 3: Place the back bulbs in a humid environment, away from direct sunlight, to stimulate the growth of shoots and roots.
Step 4: Once they sprout, repot in a new container containing a coarser medium.
Offshoots
Some orchids, such as dendrobiums, phalaenopsis, and vandal produce plantlets, or offshoots, on the nodes along the stem. Once these mature, they are called “keikis” and can be extracted from the parent plant and then potted similarly to back bulbs.
For orchids with old flower stalks, they can be induced to produce keikis by cutting the old flower stalk just above one of its nodes, then placing it in a moist, warm, and dark environment. New shoots should develop within 6 months, can be removed, then repotted into a container.
Seed
Orchid flowers that have been pollinated can develop seed capsules that can be collected and used to grow new plants. You can sow the seeds directly or store them to plant later. Make sure to sterilize the seeds before planting.
How to Clean Orchid Roots?
Step 1: Ensure your cutting tools and tray are clean and sterilized.
Step 2: Gently remove the orchids from their container, then rinse the growing medium off of the roots using lukewarm water. You can also just simply soak it in a basin of water.
Step 3: Discard the growing medium and any dried leaves and dead roots before rinsing the healthy roots.
Step 4: Soak the healthy roots in hydrogen peroxide for a minute or less. Then, report them in a new, clean container with a fresh growing medium.
Step 5: Remove any excess water that may have strayed toward the plant’s leaves.
How to Fix Orchid Root Rot?
The best and most time and money-saving way of dealing with plants with root rot are to discard them entirely. However, if you decide to keep the orchid with root rot, reduce the moisture in its growing medium or soil.
If needed, report to a new, well-draining container with a fresh and clean growing medium. Water sufficiently, but avoid overwatering.
List of Sources
Propagating Orchids – https://www.canr.msu.edu/uploads/resources/pdfs/propagatingorchids.pdf
Root Rots on Houseplants – https://hort.extension.wisc.edu/articles/root-rots-houseplants/